Stephen Tavener's Zertz Strategy Guide
I am mrraow on boardgamegeek (and many other places, including gmail) - feel free to contact me with feedback, comments, praise.
Contents
Introduction
Rules
Basics
Ball Control
Simple Exchanges
Three-ball Combinations
Sente
Isolating Balls
The Opening
The Tournament Game
Solutions to puzzles
Introduction
When Kris Burm first explained the rules of Zertz to me, I was somewhat sceptical;
since the pieces aren't owned by either player, I thought that Zertz would be a nim-like
game, with the board filling up slowly until there was no more available space, and
someone was forced to give a capture to his opponent.
I couldn't have been more wrong. I actually played in much this way for some time,
gradually realising that I could force my opponent to capture while I isolated some
balls. It wasn't until I played Yoshi Ikkai, a Japanese playtester, that I realised just
how vicious Zertz really is. With just 3 balls on the board, he fed me black and
grey balls until he had isolated 2 white balls. I fell in love with the game at that point,
though it took me several weeks to figure out just how Yoshi had beaten me!
So, Zertz is a fast and brutal game, where experienced players will seldom have more than
3 or 4 balls in play at a time. The ability to force your opponent to capture leads
to sequences of forced moves, and the game takes on much the feel of a puzzle. As such, I
feel that the best way to teach Zertz strategy is through a series of puzzles. In the
following sections, I intend to present you with the basic principles, then follow up with
a few puzzles to illustrate the principles discussed.
Rules
Context warning: at the time I wrote this article (it was originally serialised in Abstract Games magazine), the standard rules were 3/4/5/2 (white, grey, black and [each] respectively), and 4/5/6/3 was the tournament game. When Zertz was reprinted, the tournament game became the standard game.
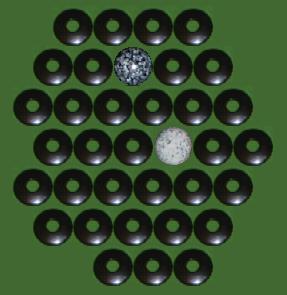
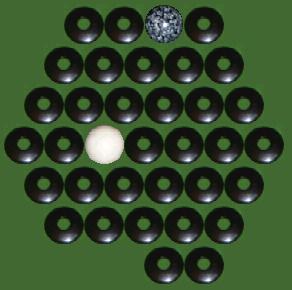
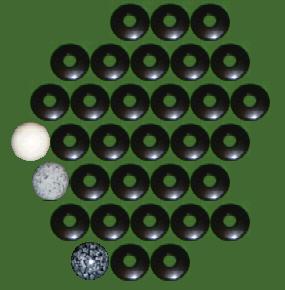
In Zertz, the board is made of 37 discs arranged in a hexagonal shape; 4 discs to a side. Playing pieces are 9 black balls,
7 grey balls, and 5 white balls; these are not owned by either player.
There are 2 types of move in Zertz:
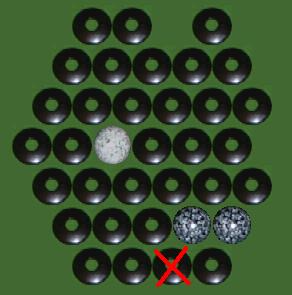
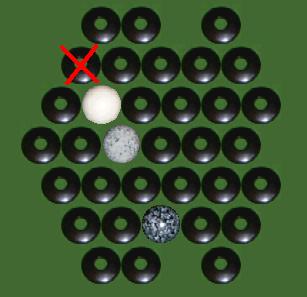
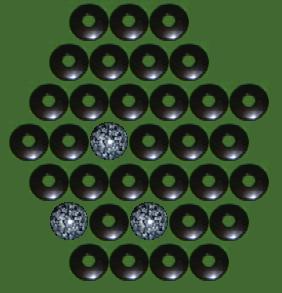
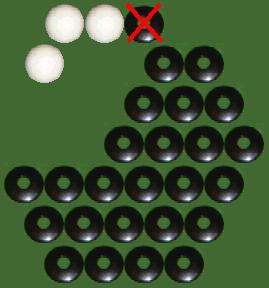
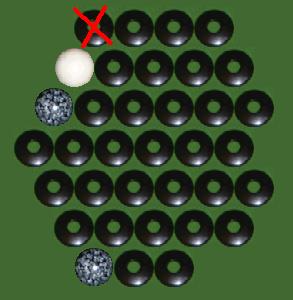
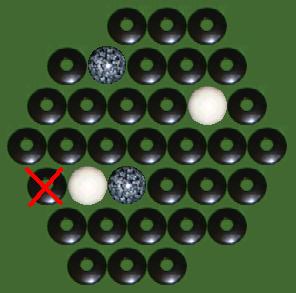
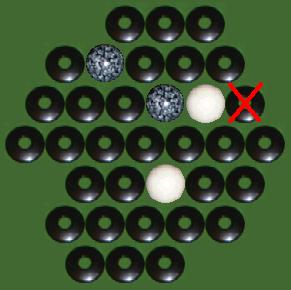
1. Place a ball on the board and remove a disc. A ball can be placed on any empty disc. The disc must be empty, and on the
edge of the board, i.e. you must be able to remove it from the board without disturbing the remaining discs.
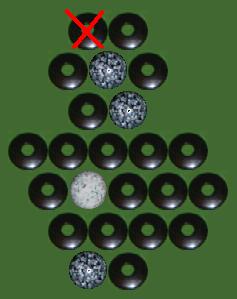
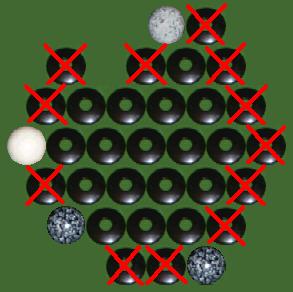 Only the empty discs marked with an X can be removed.
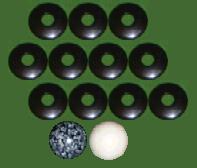
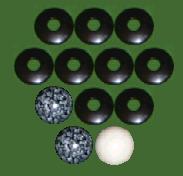
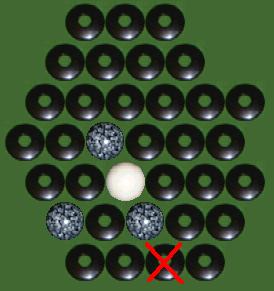
2. Capture a ball or several balls by making a jump or series of jumps. Capturing is compulsory if possible. You are not
obliged to make the longest sequence of captures possible, but once a ball starts capturing, it must continue to capture as
long as it can.
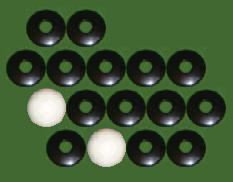
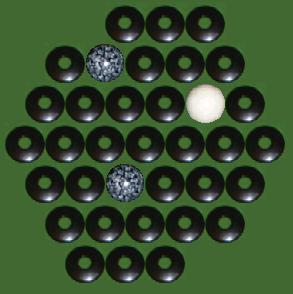
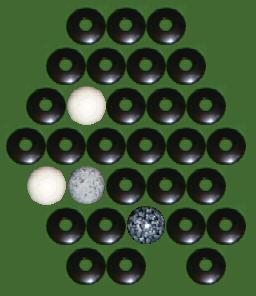
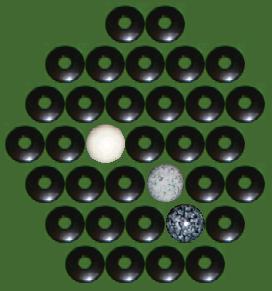 Here, the grey ball can capture the black, or the black can capture the grey
and the white.
Here, the grey ball can capture the black, or the black can capture the grey
and the white.
There are 2 ways of capturing balls:
1. By jumping, as described above
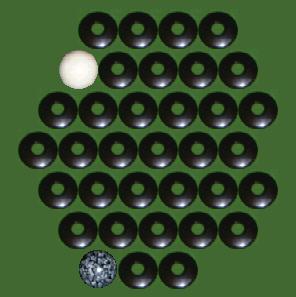
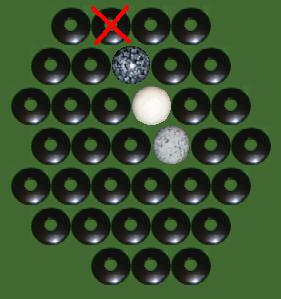
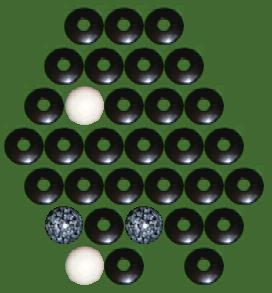
2. By isolation; if you play so that a ball, or group of balls have no liberties, you capture them.
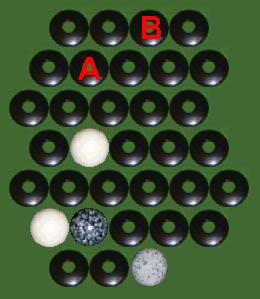
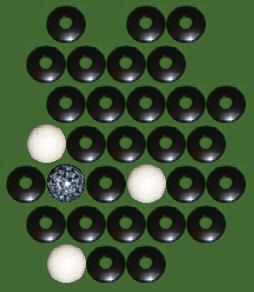
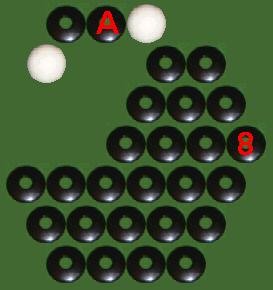
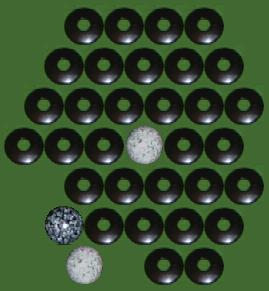
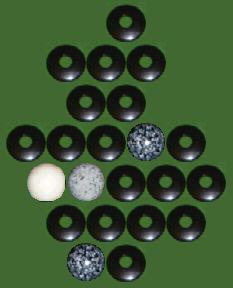
 Removing the disc marked A captures 1 grey ball. Or, you can play a ball at
A and remove the disc marked B, capturing 2 balls.
Removing the disc marked A captures 1 grey ball. Or, you can play a ball at
A and remove the disc marked B, capturing 2 balls.
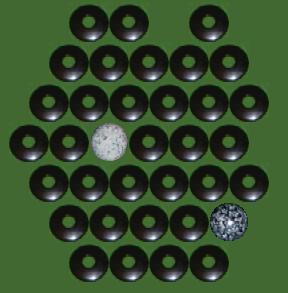
There are 2 ways of winning:
1. Capture a majority of any one colour, i.e. 3 white balls, 4 grey, or 5 black
2. Capture 2 balls of each colour.
These are the basic rules; I will discuss the tournament game later.
Basic principles
The rules above result in a very rich and dangerous game. In this section, I am going to discuss some of
the basics, which will set the tone of the rest of this series.
1. The easiest way to win a game of Zertz is by focusing on white balls - you only need 3 white balls to win,
as opposed to 4 grey, 5 black, or 2 of each (6 balls). So, white balls are more valuable than grey balls, and grey balls are
more valuable than black balls. During the course of this article, I shall be referring almost exclusively to capturing white
balls, but it may come about in an actual game that you find yourself needing only two grey balls to win. If so, all
the advice I give still applies; just substitute "grey" for white", etc. Note that you can sacrifice 8 balls without
losing the game (1 white, 3 grey, 4 black). Since you are looking to take 3 white balls, that means you should be
looking to give 2 balls for a single white ball, or up to 5 balls for 2 white balls in order to make a profit.
2. Don't set traps - this is a common misconception; Zertz is not a game where you try to set traps for your opponent.
Since all balls are owned by both players, anything that you set up for yourself, your opponent can use first. Instead, you
are looking to take a profit from the current position, or play to minimise your opponent's profit if you can't see a way to
make a profit yourself.
3. Look for a profit - this is what Zertz is really about. If you can make an exchange that leaves you closer to winning
than your opponent, then you have the advantage - unless your opponent can win next move!
4. Your opponent is there to help you - when your opponent is obliged to capture, (s)he can't do anything else. This means that you can
keep the initiative, taking several turns in a row by making your opponent capture one ball after another. This gives you
a chance to rearrange the balls in play and change the shape of the board to suit your plans.
5. The Atlantis effect - the shrinking board has several consequences; firstly, you can shepherd the balls around
the board by strategically removing discs; secondly, as the board shrinks, new strategies become viable; and finally, it becomes
harder to avoid leaving opportunities for your opponent. A very important effect of the shrinking board is that you can dictate
the way it shrinks by strategically removing discs.
Ball Control
The first step to successful Zertz play is to realise just how much control you have over the balls in play.
In this section, we are going to look at what you can do with a single ball in play, plus the help of your opponent.
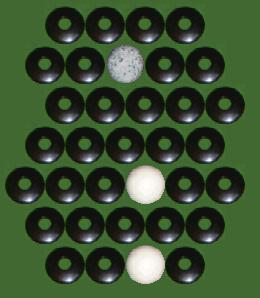
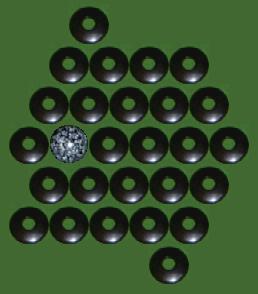
So, imagine that in the following diagram, you have a black ball as shown, but your plans require a grey ball at
position A:

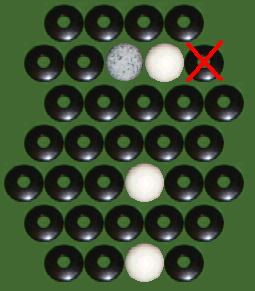
Not a problem. Just place a ball as shown here:

... and your opponent must capture, leaving a grey ball just where you wanted it and
you get to move again.
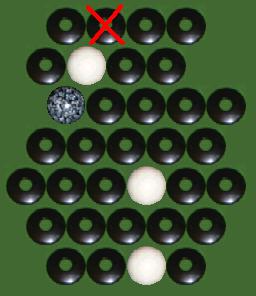
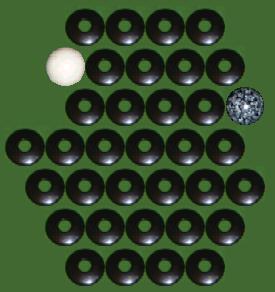
Slightly more complex, here you want the black ball at position B instead:

Again, we can do it with a little help from our opponent:

... this time, we place a ball (colour doesn't matter) and remove the disc marked. Now our opponent must
place the black ball where we want it! Note that if we don't remove this
disc, our opponent has a choice of which capture to make, and is unlikely to cooperate.
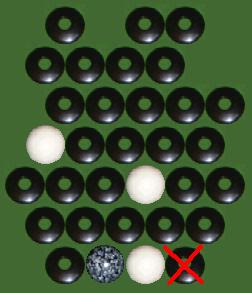
Of course, we really wanted a white ball at position B:
This requires the sacrifice of two balls, but we can still do it with a little help:
Step 1.
Step 2. 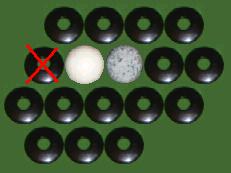
... in general, if you are willing to pay the cost, you can rearrange the balls however you like; the
exceptions are where the balls are stuck in corners, or too close together.
Simple exchanges
In this section, we're going to consider the simplest forms of exchange. Where there are 2
balls on the board, you should be looking to give your opponent 1 or 2 balls for a white. In the
early stages of the game, this is unlikely (the board is too big) but later in the game, it is
the simplest way to get ahead.
There are 2 basic patterns you are looking to make in order to get a favourable exchange:

Head-on; the commonest exchange

Trigger; almost as common, and much more useful once we start looking at more complex exchanges (for reasons I'll
discuss in the next chapter)
Notice that in both these examples, it doesn't matter whether you placed the
white ball or the black ball next to it. Your opponent must capture the black ball
with the white, then you capture the white. This illustrates an important principle:
you can capture a white ball even if there are none on the board!
Note also that the pattern is not just made by the balls, but also by the discs...
or rather, the absence of discs. In order to set up an exchange, you are looking to give your opponent a
capture while setting up a capture for yourself. This requires the ball you will use to capture to
be on the edge of the playing area, or your opponent will capture this also and leave you with nothing.
Of course, usually your opponent will not be obliging enough to line up the balls like this
for you, so you need to force your opponent to put the balls in the right position for you. Here is an example:
Note that in the position above, the balls may look impossibly far apart. However, with the
forced co-operation of your opponent you can spend a black and a grey ball to get the head-on
position:
1. line up the balls, and remove a key disc.
2. set up the trigger position. Note: this is a good example of removing a disc to force the direction of capture;
if you remove a different disc, the opponent could capture the white ball with the grey.
Puzzles
The following puzzles should illustrate the principles I have just discussed.
In each of them, you are looking to exchange 1 or 2 balls for a white ball.
Puzzle 1
 Solution
Puzzle 2
 Solution
Puzzle 3
 Solution
Puzzle 4
 Solution
Three-ball Combinations
With 3 balls on the board, you should be looking to capture 2 white balls; to do this, you
can give your opponent 5 balls and still be in a strong position. These opportunities are often
available in the opening stages of the game, but if you let your opponent get too close to winning,
you could lose before you regain the initiative! As a rule of thumb, look to leave your opponent at
least 2 balls away from winning, so 2 grey and 3 black is the most you should pay.
So, how do you capture 2 white balls with only 3 balls on the board? Well, you are looking to
make a double capture of 2 whites. This is where the trigger pattern comes in handy. Look at these
2 patterns:
In each case, you are looking at the trigger position, with an extra white ball positioned for
capture after the first jump. In both these positions, your opponent will capture 1 black ball, after which
you capture 2 white balls. Note that with more balls on the board, you could potentially capture 3 or
more white balls from the positions above - imagine white balls in the spaces marked A and B in the diagram
on the left, or in any of the spaces marked A in the diagram on the right.
With 3 balls on the board, there are a frightening number of possible
positions (approximately 300 million near the start of the game). Not to worry; the principles we discussed
in the section on simple combinations are equally true here. You know the positions you're aiming to achieve -
you just have to force your opponent to make the moves required to put the balls in the right places! You can
sacrifice 5 balls, so you have a lot of flexibility. If necessary, you can force your opponent to move each of
the balls in play.
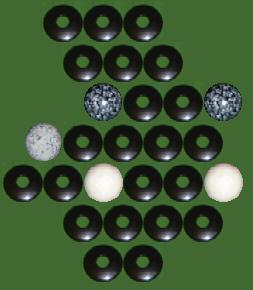
Look at the following example (taken from an actual game):
From here, it only takes 4 balls to set up a double capture...
Note that all of these moves should be familiar to you from the section on simple combinations. Nothing new is required,
except the ability to look a little further ahead. With so many possibilities, I find the easiest way to do this what I call
"applied wishful thinking" - first imagine the board and balls as you want them to be, then figure out a sequence of moves which
will create that pattern.
It is not always possible to exchange 5 balls for 2 whites, but you should look hard for such an exchange.
If you can't find a good sequence of moves, you must add another ball to the board; now your opponent may be able to
exchange 8 balls for 3 whites in a single sequence of moves, winning the game in one fell swoop.
Puzzles
In the following puzzles, you are looking to get two white balls. Give the minimum number of balls to your
opponent, without exceeding 2 grey and 3 black. Good luck!
Puzzle 5
 Solution
Puzzle 6
 Solution
Sente
Sente is a term I have stolen from go, but very useful for Zertz as well. In Zertz, a player
can be said to have sente when they are not obliged to capture, and therefore have a free
choice of move. A move which does not force your opponent to capture, and therefore gives the initiative
to your opponent is said to be gote. Playing sente moves is a good thing, since once the board
has shrunk a little, sente is probably worth two balls of your choice.
Bearing this in mind, look at the following rather crowded position (taken from an actual game):
By playing a white ball at A, you can set up the capture of 2 white balls in two ways:
Capturing 2 white balls, and ending at B may be your first choice, but this is a gote move
(it gives your opponent sente).
However, if you capture 2 white balls and end at C, your opponent must recapture, leaving you with sente
in the following position:
... from which you can win in several different ways.
When the board is crowded, it is always worth looking for a combination which lets you keep sente.
In order of priority:
1. look for a win
2. look for a sente move
3. look for a move that doesn't lose!
Puzzle 7: sacrifice 2 black and 1 grey for a white, while keeping sente.
 Solution
Isolating Balls
As the board shrinks, a new strategy becomes viable; isolation. Strictly speaking, it is possible
to isolate 1 or more balls at any stage in the game, but at the start of the game, it is generally much
too expensive to be viable. As the number of discs in play falls, so do the number of discs you need to
remove to isolate a ball.
Isolation is potentially more profitable than the exchanges I discussed before; with 3 balls on the
board, an exchange can get you at most 2 white balls. By isolating balls, you can get 2 white balls
starting with only 1 ball in play!
There are several ways of isolating a ball (or balls), each with their own benefits. I shall
discuss them below.
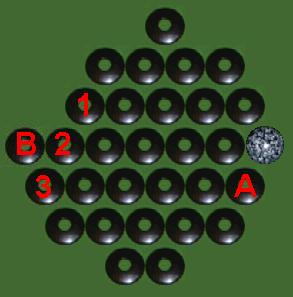
Isolating a ball in play
Look at the following situation:
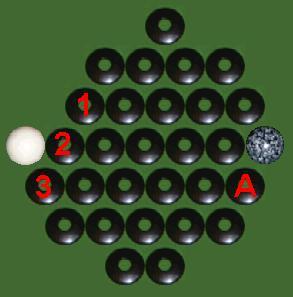
Here, you can capture the white ball by isolating it. As with the exchanges, you have to pay your
opponent some balls for the privilege.
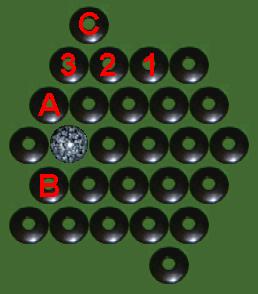
Move 1: play a ball at position A, and remove the disc marked 1.
Move 2: play a ball at position A, and remove the disc marked 2.
Move 3: play a ball anywhere, and remove the disc marked 3.
The white ball is now yours, for the reasonable price of 2 balls. However, this is a gote move -
you have given the initiative to your opponent.
A better plan may be to play a ball at position A on the third move. Now, you have
exchanged 3 balls for 1 white ball in sente. This is a good thing.
Isolating an empty disc
This situation is very similar to the previous diagram, but this time no white ball:
Here, you can still capture a white ball by isolating it. Oddly, the cost is no higher than before...
Move 1: play a ball at position A, and remove the disc marked 1.
Move 2: play a ball at position A, and remove the disc marked 2.
Move 3: play a white ball at position B, and remove the disc marked 3.
The white ball is now yours, for the reasonable price of 2 balls. However, unlike the previous example,
this can only be played as a gote move.
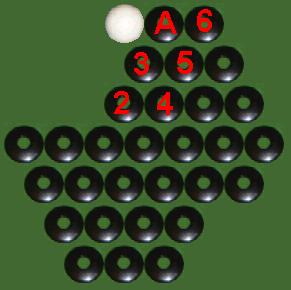
Multiple balls
Again, you'll recognise this position; this time, though, we want to get 2 white balls:

Move 1: play a ball at position A, and remove the disc marked 1.
Move 2: play a ball at position A, and remove the disc marked 2.
Move 3: play a ball at position A, and remove the disc marked 3.
Move 4: play a ball at position A, and remove the disc marked 4.
Move 5: play a white ball at position B, and remove the disc marked 5.
2 white balls for 4 balls of your choice. A bargain! (Again, this is always a gote move.)
Note: when isolating balls, you need to give your opponent 1 fewer ball than the number of discs
you want to remove. (Under some circumstances you may give your opponent an extra ball to keep sente.)
Two for the price of one
So you're trailing... your opponent has just taken 2 white balls in the opening, and there is only 1
ball in play. Odds are, your opponent will be able to isolate a white ball on her next move for the win.
You need a miracle. Well, here it is!
This is advanced stuff, but well worth the effort of mastering... the look on your opponent's face when
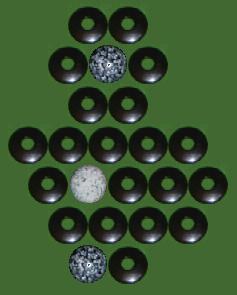
you pull it off will be reward enough for your efforts. Look at the following diagram:
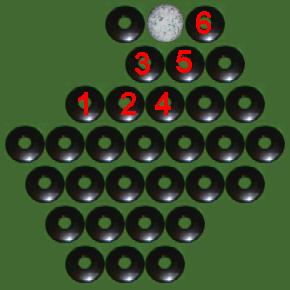
From this seemingly innocuous position, we are going to isolate 2 white balls:
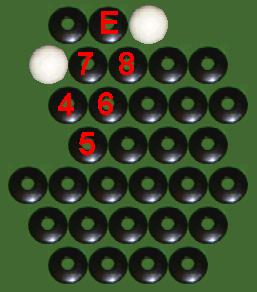
Move 1. Place a white ball on position 6, and remove the disc marked 1.
Move 2. Place a ball on position A, and remove the disc marked 2.
Move 3. Place a ball on position A, and remove the disc marked 3.
Move 4. Place a ball on position A, and remove the disc marked 4.
Move 5. Place a ball on position A, and remove the disc marked 5.
Move 6. Place a white ball on position A, and remove the disc marked 6.
Net result; you spent 5 balls and captured 2 white balls. Of course, you could just as easily have
captured 2 grey or 2 black balls, which may have allowed you to win outright. Better still; the
only thing your opponent can do on his next move, is place a ball on the board, so although you have
captured 2 balls in gote, your opponent must make a gote move. This gives you the
initiative again, and hopefully the win!
Isolation in the opening...
Isolation is not usually cost-effective in the opening, but do watch for positions where there are
2 white balls together at the edge of the board:
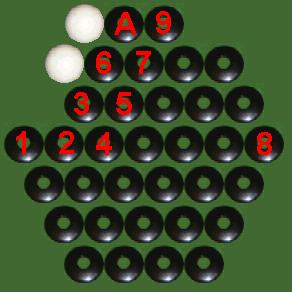
Here, we can isolate 3 white balls for an instant win!
Move 1. Place a ball at position A, and remove the disc marked 1.
...
Move 7. Place a ball at position A, and remove the disc marked 7.
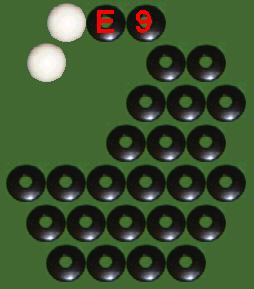
After our opponent captures, the position is now:
Move 8. Place a ball at position A, and remove a disc at random - 8 will do nicely.
This corrects a parity problem - we need the jump to put the white ball back in position,
but we have already removed all the discs we need.
Move 9. Finally, place a white ball at A and remove the disc marked below to isolate 3 white balls.
Note: we have to give our opponent 8 balls - the maximum possible - to achieve this coup
Puzzles
 Puzzle 8
Isolate 1 white ball
Solution
Puzzle 9 (same position)
Isolate 2 white balls
Solution
 Puzzle 10
Isolate 3 white balls!
Solution
The Opening
The opening is the most difficult aspect of Zertz. After the first 2 moves, most positions are safe; however,
after 3 moves, there is a good chance that the second player can capture 2 white balls quite cheaply
(see 3-ball combinations).
This puts the onus on the first player to play defensively, and make this first opportunity for profit as expensive
as possible. Conversely, the second player should be looking to set himself up for a double capture as cheaply as
possible.
The practical upshot of this is that the first player wants to restrict mobility of the balls as much as possible; a
couple of methods I use are:
1. Play the first ball in a corner, and remove an adjacent disc. For the third move, play adjacent to this ball, and
again remove an adjacent disc. e.g.
A nice, safe position, where player two will be hard pressed to make a profit. With 4 balls on the board, the
advantage is passed back to player one.
2. Play a white ball first in the central 7 discs, and play a white ball in the most inconvenient place you can find
for your second ball. This is rather more dangerous than the first approach, but you are trying to set up a pattern
where your opponent must leave you 2 balls away from winning, either by giving you at least 1 white ball in the
forthcoming exchange, or 2 greys, or 3 blacks (i.e. any 4 balls). After the exchange, you are looking to isolate
the 2 balls you need for an instant win. Note that once your opponent succeeds in capturing 2 white balls, you can
only give him 1 grey and 4 black = 5 balls without losing, so this can be very dangerous indeed. For example, look at
the following position:
Player 1 started by playing near the centre. His opponent made what I believe is the most aggressive response, looking
for a double capture next move. Which are the best places to play a third ball?
Solution
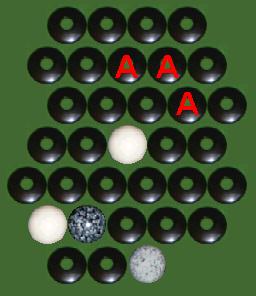
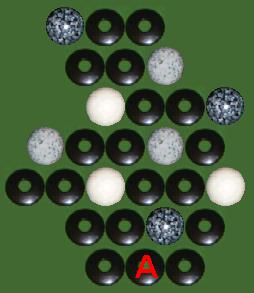
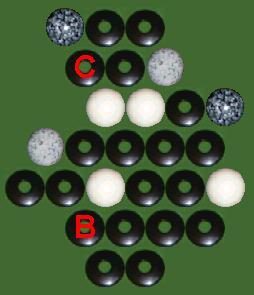
Finally, have a look at the following position:
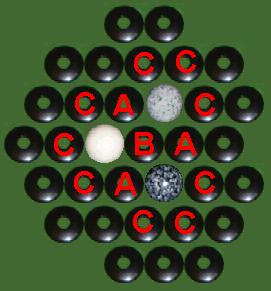
It is impossible to profit from this position! Playing at any of the positions marked A will force
your opponent to capture all 3 balls. Position B is almost as bad, allowing your opponent to
capture any 2 balls of his choice. The positions marked C are slightly better - they allow you to
choose which 2 balls your opponent gets. Once more balls have been placed on the board, this could be
to your advantage (see the section on sente), but not yet. Note: this positions is only possible
with the co-operation of both players.
The Tournament Game
In the tournament game, the rules are unchanged apart from the following:
1. There are now 10 black balls, 8 grey balls, and 6 white balls.
2. To win, a player needs a majority of any colour (4 white, 5 grey, or 6 black), or 3 of each colour.
To a large extent, everything I have said about the basic game applies to the tournament game as well.
So, the easiest way to win is by capturing 4 white balls (as opposed to 5, 6, or 9 balls), and you can
give away 11 balls without losing the game. This makes 1 white ball worth about 2 balls, 2 white worth
about 5, and 3 white worth about 8 - much the same as in the basic game.
The main change between the basic and tournament games comes in and after the opening...
The opening revisited
Unlike the basic game, you need 4 white balls to win; with 3 balls on the board, the second player
would still like to capture 2 white balls, but this is no longer the crushing advantage that it was.
Assuming player 2 has just captured 2 white balls, player 1 can still give away up to 9 balls without losing
the game - more than enough to isolate a couple of balls and leave the playing area empty.
So, player 2 cannot afford to give away more than 3 black and 2 grey to get 2 white. Giving away 1 white ball
is no longer potentially fatal, as it was in the basic game, but if player 2 does gives away a white, player 1
has the chance to isolate 2 white balls. Now, player 1 has 3 white balls and player 2 has captured 2 white
balls, leaving 1 white ball remaining; player 2 can no longer win by capturing white balls, though the extra
balls player 1 has just given him while isolating the white balls will give him other options.
Solutions to puzzles
Note: in these solutions, I have marked the disc to be removed only where it is necessary for the solution.
Where no disc is marked, it is only important to avoid removing discs that the balls will be passing through.
Simple Combinations: Puzzle 1
Coax the white ball around the corner, and you have a head-on exchange. Note that this is another
case where you have to remove a key disc to make sure your opponent captures in the correct direction.
Simple Combinations: Puzzle 2

Although the balls are jammed together in a corner, you can lure one out
to get the trigger position.
Simple Combinations: Puzzle 3

This is neither the trigger nor the head-on exchange, but is a situation
you may see occasionally. Whichever way your opponent takes, you can capture a white ball.
Note that this only works because both balls are (a) white, and (b) on the edge of the board.
Simple Combinations: Puzzle 4
This is the head-on collision again; note that although the balls are in
the right positions already, you have to start with a waiting move, allowing you to remove
a disc while keeping the initiative.
Three-Ball Combinations: Puzzle 1
A simple puzzle to start you off: step 1 is to put a white ball in the
right place for the second jump, then we just need to pull the trigger.
Three-Ball Combinations: Puzzle 2
Slightly more complex. Note there are no white balls on the board, but you can still
get 2 white balls for only 3 others.
Sente: Puzzle 1
1. Line up the 2 black balls.
2. Line up the white; after you capture the white, your opponent must recapture.
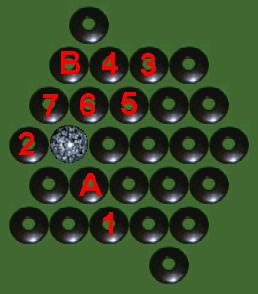
Isolation: Puzzle 1
Move 1. Place a ball at A, and remove the disc marked 1.
Move 2. Place a ball at B, and remove the disc marked 2.
Move 3. Place a white ball at C, and remove the disc marked 3, isolating 1 white ball.
Isolation: Puzzle 2
Move 1. Place a white ball at A, and remove the disc marked 1.
Move 2. Place a ball at B, and remove the disc marked 2.
Move 3. Place a ball at B, and remove the disc marked 3.
Move 4. Place a ball at B, and remove the disc marked 4.
Move 5. Place a ball at B, and remove the disc marked 5.
Move 6. Place a ball at B, and remove the disc marked 6.
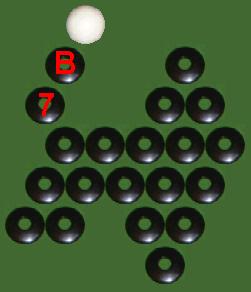
Move 7. Place a white ball at B, and remove the disc marked 7, isolating 2 white balls.
Isolation: Puzzle 3
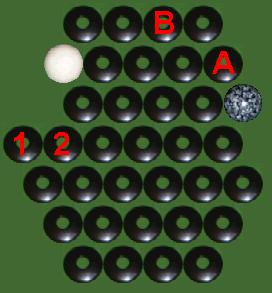
Move 1. Place a ball at A, and remove the disc marked 1.
Move 2. Place a ball at B, and remove the disc marked 2.
Move 3. Place a white ball at C, and remove the disc marked 3.
Note: placing a white ball at D instead is fatal. Try it!
Move 4. Place a ball at E, and remove the disc marked 4.
Move 5. Place a ball at E, and remove the disc marked 5.
Move 6. Place a ball at E, and remove the disc marked 6.
Move 7. Place a ball at E, and remove the disc marked 7.
Move 8. Place a ball at E, and remove the disc marked 8.
Move 9. Place a white ball at E, and remove the disc marked 9, isolating 2 white balls.
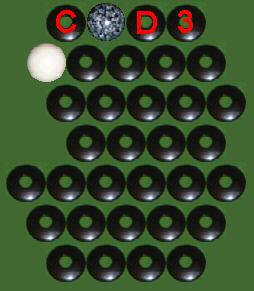
Opening: Puzzle 1
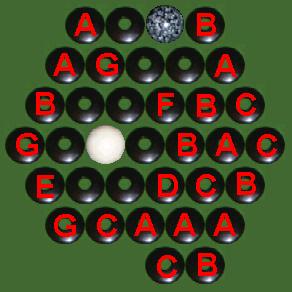
If you choose the third ball and disc with care, and your opponent decides to capture 2 whites,
here is the best your opponent can do:
A: 3 balls
B: 3 balls including 1 white ball
C: 4 balls
D: as B, or (worse for you) opponent can trade 2 balls for a white, leaving much the same position
E: 4 balls, including 1 white - or opponent can trade a white for a white, leaving much the same position
F: 4 balls, including 1 white
G: 5 balls
Playing in positions marked B,C,E,F, or G gives you at least a chance to win when you regain sente, by isolating 2
balls; obviously, after a 5-ball sequence, the board will be smallest, maximising your chances of an instant win.
Playing a ball in the positions marked A and D should be fatal against an adept opponent.